Making, AND weathering real wooden ties in HO scale.
Just a simple way I'm making and weathering "old" ties in HO scale.
Warning! A portion of this article is explained two different ways. One version uses a grill lighter. Children should NOT attempt this with out adult supervision!
Now that thats out of the way, we can begin. For this article, you'll need the following:
● Hobby Knife
● Balsa wood sheet ~3/32" thick for HO
● Grill Lighter
● Brown, Gray & Black chalks
● Dullcote
● Rust colored paint
● Paint thinner
● OPEN AIR ROOM
● Tweezers or needle nose pliers
Optional replacements/removals:
● Pre-cut ties replacing the balsa sheet
● Not using the lighter
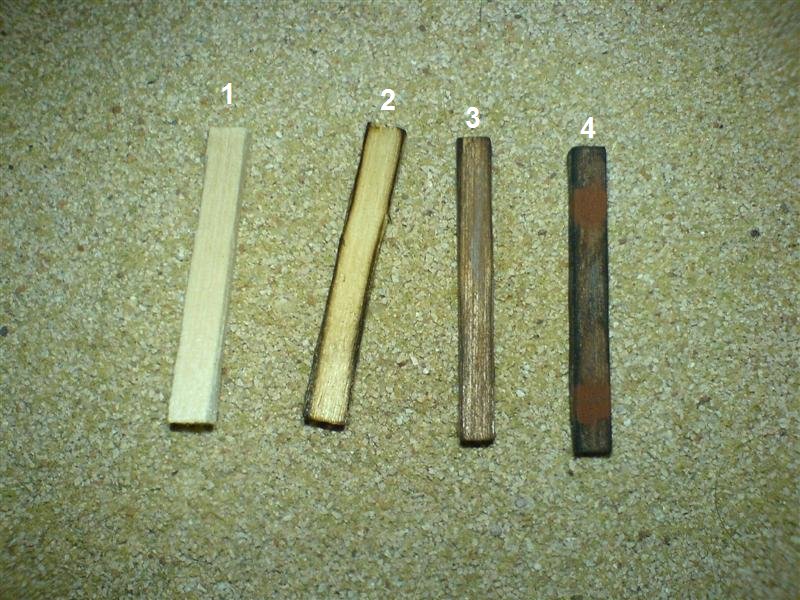
To begin, slice some some ties from the balsa sheet. They should have the wood grain length wise. I cut mine to 1 1/8"
long, by about 3/32" x 3/32" to create a generally square end profile. See tie #1 above. This works for HO scale, other
scales should be adjusted to what you feel is best. This step can be replaced by buying a package of pre-cut scale wood ties. You MUST use wood ties, otherwise this tip will not work correctly!
Now that you've sliced some ties, its time to light them up. Remember, this step IS NOT to be attempted by children with out adult supervision! Pick up a tie with your tweezers or needle nose pliers. Using the grill lighter, carefully burn the end of the tie thats exposed. The point is not to light the tie on fire, but rather burn off small strands of wood, and get the edges and corners to blacken. Now flip the tie around & repeat. See tie #2 above. This step can be skipped, and the black chalks in the next step can do the blackening of the edges.
Once you've completed both ends and the tie looks similar to #2 above, you'll want to add the chalks. I bought a cheap $5 pack of artists chalks at a craft store. It came with 24 colors. We'll be using brown, gray & black. I start with the brown. Using the end corners of the chalk, I run it back & forth down the sides of the tie. After an even coat I use my fingers to blend it all in. This will remove a bit of the chalk so I put on plenty. Now repeat with the gray. I used allot of brown and a little gray, but if you use more gray, it will look like an old dried out tie. The black chalk is used on the edges, the same way burning the tie was. If you did burn the tie, you should not need much black. If you did not, use more black, to get stronger, more dominant edges. It should looks like tie #3 above.
Now that your ties are chalked, you need to seal them with dullcote. I just sprayed each side once, just enough to seal the chalks into the wood. Use dullcote, and not a satin, or gloss as ties usually are very dull, after all, they're wood. You can add gloss with a brush to certain areas to get the looks of excess creosote, which does have a shine to it.
After the dullcote, you can add rust patches from the tie plates. Measure in approximately 1/8" from the ends, then add a 3/32" rust patch. I used Model Masters rust, which is thinner based for one reason. After applying the rust, dip the brush in thinner, and dab it onto the rust, it will make the rust run & seep into the wood, just as real rust stains would looks on wood. Now your tie should look like #4 above.
Optional details:
-Using a pin, press into the tie where the spikes would have been, to make spike holes.
-Using a file, file a small 3/32"-1/8" slot where the tie plates would have been, as if the tie was notched to fit.
-Purchase some etched metal tie plates (Available on Proto:87 Stores [http://www.proto87.com]), rust them, an attach with
scale spikes, as if the tie plates had not been removed.
-Completely blacken ties to mimic burnt ties.
-Break some ties into pieces before burning.

© 2007, 2019, Josh Baakko, http://www.modelrailroadtips.com