- Details
- Written by Josh Baakko
- Category: Diesel Projects
- Hits: 3552
Identifying Distinguishing Details on a GEC Alstom SD40 Rebuild
Part one of a 4 part series detailing GEC Alstom rebuilds.
Part 1: Identifying details (this article)
Part 2: Employing the details (future)
Part 3: Paint, & decaling a BNSF rebuild (future)
Part 4: Finding and modeling other GEC rebuilds (future)
To begin a project like this, we need to know what we're up against. The following pictures are of two
BNSF units, and the details vary by unit, so it is pertinent to research the exact unit you'd like to model. In
parts 2 & 3 we'll be following the time line of BNSF #7311, which is one of 6 I intend to model.
Here we have an engineer's side/front "roster shot" of BNSF #7324. We'll look at the details here first.

Read more: Identifying Distinguishing Details on a GEC Alstom SD40 Rebuild
- Details
- Written by Josh Baakko
- Category: Diesel Projects
- Hits: 2766
Modify a Sergent EN87 to fit in a RailFlyer chassis
What I did to mate the Sergent coupler with the RailFlyer chassis
Fairly simple modification to fit in the coupler pocket.
This seemed like it was going to be a tall order. The Sergent EN87 is designed to fit in an Accurail
P:HO narrow coupler box. The RailFlyer chassis is deigned to prototype specs.
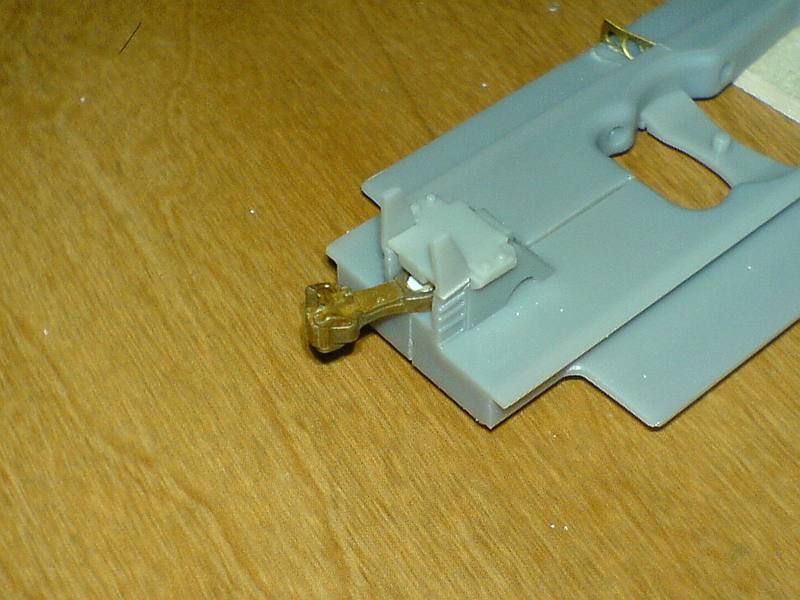
The first thing you'll notice is the Sergent EN87's coupler pivot hole is too far forward to fit in the
RailFlyer pocket. I figured I could just file the rear of the coupler, or the rear of the box to make due.
However this turned out to be an impractical idea, as the coupler would nearly brush the coupler plate
when done! Here's my solution.
Read more: Modify a Sergent EN87 to fit in a RailFlyer chassis
Page 3 of 3