Identifying Distinguishing Details on a GEC Alstom SD40 Rebuild
Part one of a 4 part series detailing GEC Alstom rebuilds.
Part 1: Identifying details (this article)
Part 2: Employing the details (future)
Part 3: Paint, & decaling a BNSF rebuild (future)
Part 4: Finding and modeling other GEC rebuilds (future)
To begin a project like this, we need to know what we're up against. The following pictures are of two
BNSF units, and the details vary by unit, so it is pertinent to research the exact unit you'd like to model. In
parts 2 & 3 we'll be following the time line of BNSF #7311, which is one of 6 I intend to model.
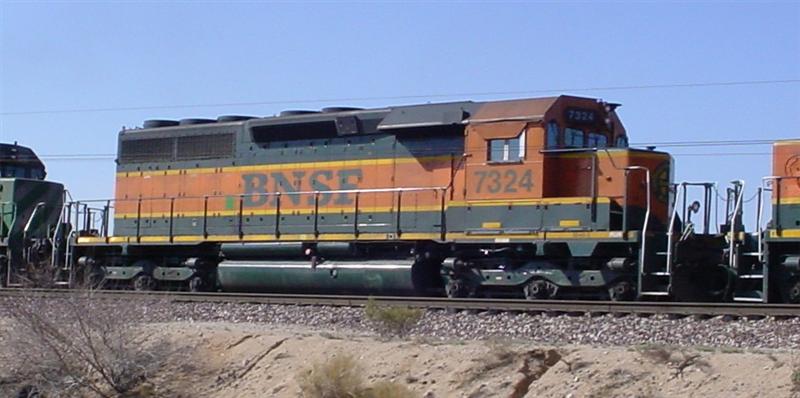
Here we have an engineer's side/front "roster shot" of BNSF #7324. We'll look at the details here first.

Following the circles in a clockwise fashion you'll see the following numbers, which correspond to a detail I
choose to model which is visible.
1. Lift lug, Detail Associates carries these lugs in a pack, there's one large lug per side, on the rear of the
hood.
2. Radiator fans... To model these units correctly one must watch these fans closely, as not all are the same.
If you look closely you'll see that the rear one is taller then the rest. To model, use dynamic brake fans for
the shorter and cooling fans for the taller. Some units may also have "Q" fans mixed in.
3. DB hatch, watch closely, MOST BNSF units have the larger style common to SD40-2's but a few have
the slightly smaller version found on SD40's. Fans vary here also, but most seem to have low fans.
4. The snow shield, a common sight on CN SD40's which these units were "born" as. This is a tell tale sign
of GEC Alstom rebuild on the BNSF.
5. Lower number boards, there's also two round plates just above it where the class light holes were covered
up.
6. Pyle "early" head light, found on all GEC rebuilds on the BNSF.
7. Small 1/2 circle plate, which supports an antenna (we'll cover antenna and roof details later).
8. TALL ditch lights, these will have to be scratch built to look correct.
9. Large metal plate, not sure of the purpose here, but its common to these rebuilds.
10. Split air reservoir. The fuel filler on these units is directly in the middle of the tank.
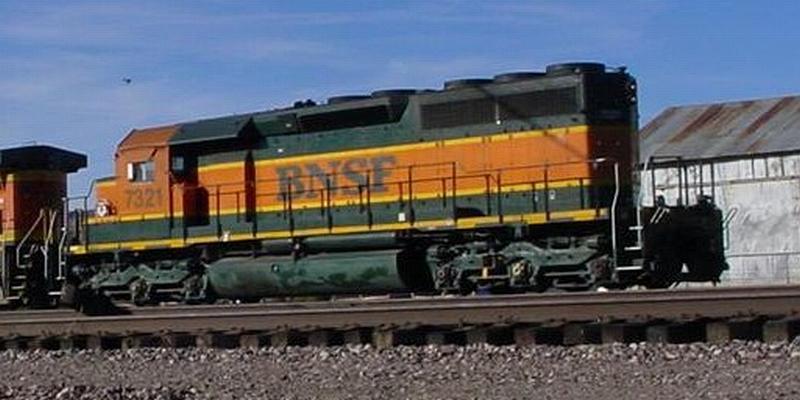
Now on to a conductor's side / rear "roster shot" of BNSF #7321. Again clockwise numbering.
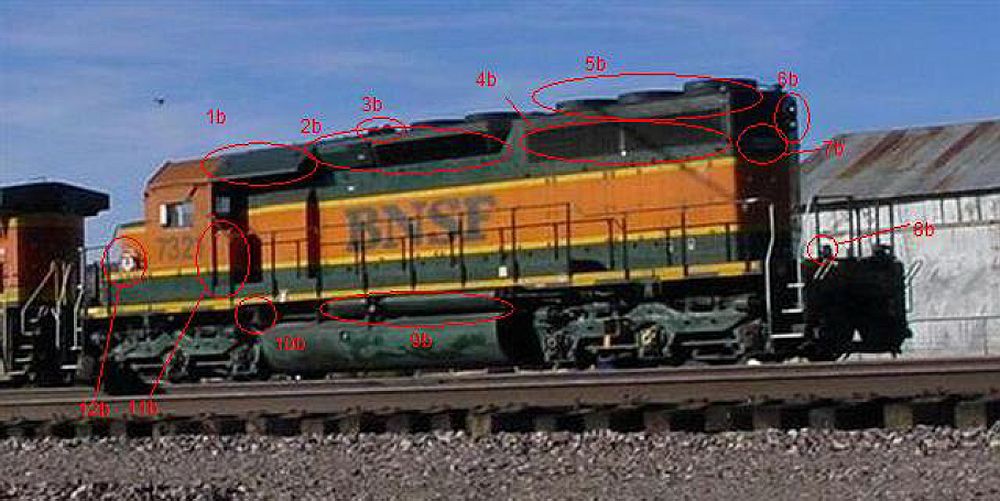
1b. Conductor's side snow shield.
2b. Again, a large DB bulge.
3b. Air horn. Its hard to tell in this shot, but most BNSF units have a K3LA, only Overland makes these in
HO scale...
4b. Radiator grills. Most seem to be the old SD40 style, check to be sure.
5b. Again, notice the one taller fan.
6b. Pyle "early" headlight mounted vertically.
7b. No number boards, BUT the road number is applied to where the number board should be.
8b. Lifting tabs, similar to the hood mounted, but much larger.
9b. Split air reservoir on this side too.
10b. Bell location.
11b. Air Cabinet filter box, common on all Dash 2's, added to the GEC rebuilt SD40's.
12b. Brake wheel, seems quite common to the BNSF units, but again, check to be sure.
Not shown in these pictures:
- The roof line of the cab is double layered.
- Two Sinclair style antenna's, smaller one mounted at the seam of the 1/2 circle plate & roof, and the larger
to the engineer's side, slightly off center.
- Conduit from cab to air horns.
- Conduit from number board to short hood, between middle two windows.
Stay tuned for part #2, coming in 2-3 weeks, employing the details we discussed here.
© 2006, 2019, Josh Baakko, www.modelrailroadtips.com