Installing an NCE DA-SR Decoder in a Genesis SD75M
NCE includes amazing instructions, but here's a quick illustration anyways. This install applies to all early run Genesis SD70 series locomotives, to include: SD70, SD70I, SD70M, SD75M, SD75I, and SD70MAC. Later run locomotives look slightly different. Locomotives from the 2007 are quick plug equipped.
As stated, NCE included some great instructions with this decoder. This is mostly intended to be a visual aide to the NCE instructions.
I'm installing this decoder in Athearn's stock number ATHG6176, SD75M, BNSF/Heritage II #8258. At the same time I'll be replacing the lighting (most likely), detailing, and weathering the unit.
Removing DC power board
To install the DA-SR you'll have to remove the DC power board. I use a set of needle nose pliers to pull the black plastic friction caps off. There should be 8 large, end caps, and 2 small side caps. Be sure to keep them separate, and save them for later. Use your fingertip of tweezers to pull the wires out. Then use your finger to press the clips holding the board towards each other, this should release the old board. Discard the board (I sell mine!).
Motor Wire Install
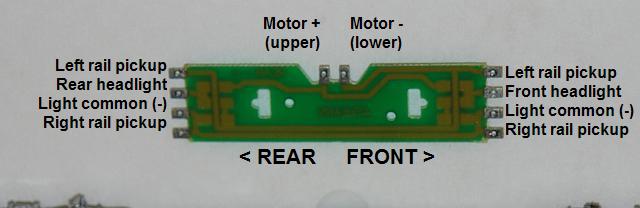
The motor gets its power through the red & black twisted wires. NCE does not describe this very well, because there's a chance these are "backwards". The illustration1 that NCE provides states "Motor + (upper)" and "Motor - (lower)", so I've installed them in that order. Upper & lower indicating were the wire attaches to the motor.
Thread the wires through, and fold the wire flat on top, angled away from the side to aide in pressing on the cap, then press on the small cap with your fingers. Now seat all the way, I've found that using a hard object (pliers!) to press on the end makes it easier to seat it all the way.
Track Pickup Leads
Hook up the Right to the Right, Left to the Left. Once again fold the wires flat, then press on the large caps.
Your decoder should now look like this:
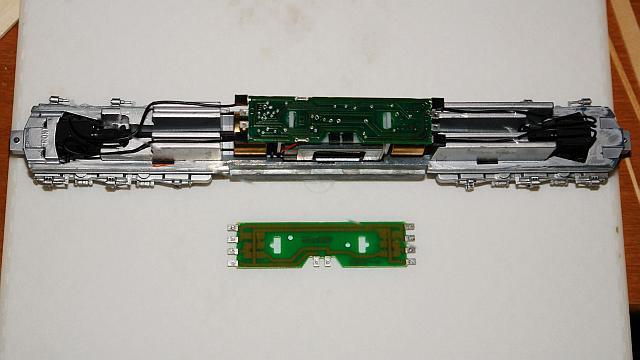
NCE DA-SR installed without lights, stock power board below, uninstalled.
Headlights
NCE recommends 12v-14v lights (Miniatronics #18-012-10 [note: NCE's instructions say #18-712-10, which is incorrect], or #18-014-10), or Chicago Miniature white LED's. I plan to try out some Ngineering 3.6V 2x3mm incandescent LED's.
If you use the stock bulbs, remember they're 1.5v! NCE recommends a 620ohm 1/4 watt resistor, and wiring the lights in a series.
If using an LED, a 1K (1000) ohm 1/4 watt resistor is required per LED.
Image copy of NCE illustration. It's important to note, this is the stock power board, used for illustration purposes only. I'll replace it with a better shot when I get another decoder.
For more on DCC, see these books:
DCC Projects & Applications V4 (Model Railroader Wiring & Electronics)
The Digitrax Big Book of DCC
©2008/2020, Josh Baakko, https://www.modelrailroadtips.com